Generating EMF Models from XML Schema Definitions (XSDs)

In this blog post I will show how to generate models for the Eclipse Modeling Framework (EMF) out of an XML schema definition. EMF is a powerful framework which allows you to create Java classes corresponding to the XML schema types, code to load XML documents to Java models and code to serialize Java models back to XML again. As an example, I will use MusicXML schema definitions.

Installing Required Features

To work with EMF and XSD schemas, you need to install the following features in your Eclipse development environment:

  • EMF – Eclipse Modeling Framework SDK
  • XSD – XML Schema Definition SDK

You can check for already installed in the About dialog of your Eclipse installation. In case the features are not installed yet, go to Help -> Install New Software… and choose the update site corresponding to your Eclipse version. For example, for Eclipse 2019-09 the update site is http://download.eclipse.org/releases/2019-09. Search for the two features and install them.

Creating an EMF Project and Importing the Model

If you don’t have a project already, create one using New -> Other… -> Eclipse Modeling Framework -> EMF Project. Specify a project name and click Next. Several model importers should be proposed.

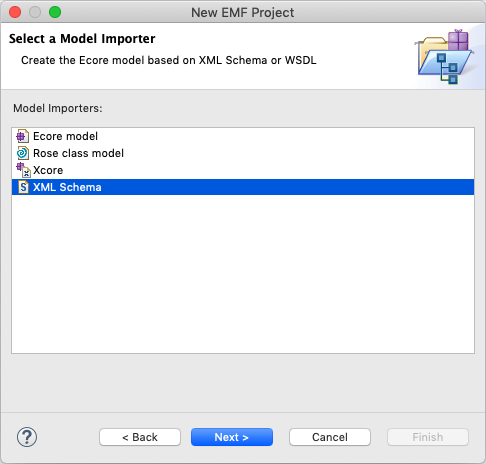
Select XML schema in the list (it should have been installed with the XML Schema Definition SDK) and Click Next. The following page appears:

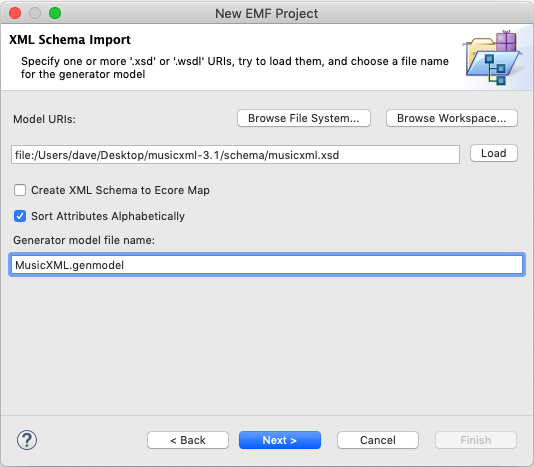
Click Browse File System… and select the XSD you would like to import. I recommend not to select the option Create XML Schema to Ecore Map. The Generator model file should have an appropriate name already, otherwise you can change it here. I changed the capitalization slightly. Click Next.

On the next page you can specify the file name of the generated ECore model file. It should align with the generator model file name you just specified. Click Finish.

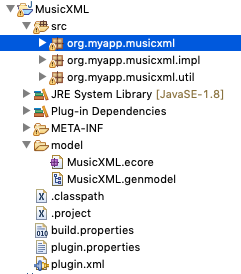
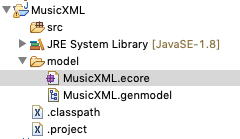
You should end up with a new project containing the folder 
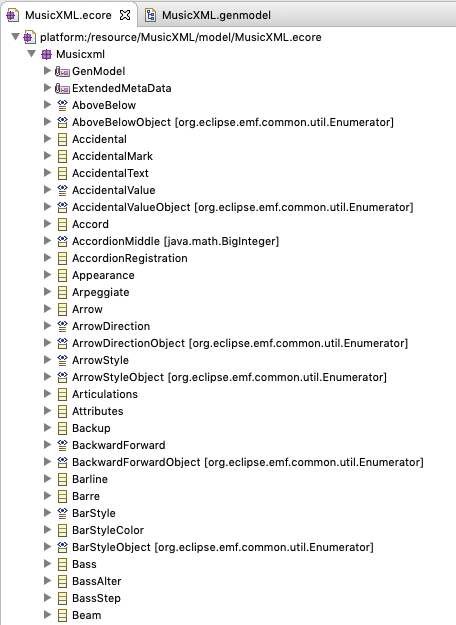
model. It in turn contains the imported data model in an ecore model file (MusicXML.ecore). It also contains a generator model file named MusicXML.genmodel. If you want to make any adjustments to the data model (classes and attributes/references), this can be done in the ECore model. However, since this an imported model this should not necessary in our case. Below is a screenshot of the imported model:

Adjusting the ECore Model

The only adjustments we need to do for now in the ECore model are:
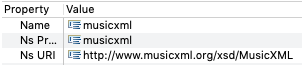
  1. Right-click the Musicxml package below the root element and choose Show Properties View
  2. Change the Name and the NS Prefix to musicxml (note the lower case m). This is important because this will become part of the java package we will generate.
  3. Set the NS URI to http://www.musicxml.org/xsd/MusicXML

Adjusting the Generator Model

The generator model gives us control about how and where the Java classes for our model will be generated. Select the package below the root element and open the Properties view. Adjust the following settings:

  • Base package: enter the common Java package name prefix which should be put in front of all classes/interfaces/enums to be generated, e.g. org.myapp. Note that the ECore package name will be appended to this prefix automatically. For example, if you use the base package org.myapp and your ECore Package name is musicxml, the code will be generated in the Java package org.myapp.musicxml.
  • Prefix: this is the class name prefix used for EMF-specific classes such as factories and utility classes. I propose to change this to a CamelCase identifier you would put at the beginning of a Java class name. Example: the prefix MusicXML will generate class names such as MusicXMLFactory, MusicXMLPackage, MusicXMLResourceImpl.

Generating the Java Code

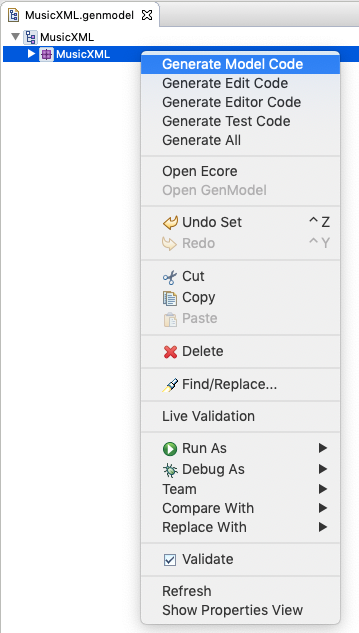
Now it’s time to generate the java classes. In order to do that, right-click on the MusicXML package and choose Generate Model Code.

After the operation finishes, you will see lots of interfaces/classes/enums generated in the src folder of your project:

If you want the source code to be generated in another source folder such as src/main/java, this can be adjusted when editing the properties of the root object of the generator model.

Loading an XML File

Now that we have our Java code, we can use the EMF infrastructure to load an XML file to a java model. Loading a file in EMF typically involves:

  1. Creating a ResourceSet
  2. Registering appropriate resource factories in the resource set
  3. Loading a resource by specifying an URI

The following code assumes that a file is loaded from disk, but you could also specify internet URIs instead of the file URI:

1
2
3
4
5
6
7
8
9
10
11
12
13
public static Resource loadMusicXMLFile(File musicXMLFile)
{
    ResourceSetImpl resourceSet = new ResourceSetImpl();
    resourceSet.getResourceFactoryRegistry().getExtensionToFactoryMap().put("xml", new MusicXMLResourceFactoryImpl());
    resourceSet.getResourceFactoryRegistry().getExtensionToFactoryMap().put("musicxml", new MusicXMLResourceFactoryImpl());
 
    // disable DTD resolution since it fails for MusicXML files
    Map<String, Boolean> parserFeatures = new HashMap<>();
    parserFeatures.put("http://apache.org/xml/features/nonvalidating/load-external-dtd", false);
    resourceSet.getLoadOptions().put(XMLResource.OPTION_PARSER_FEATURES, parserFeatures);
 
    return resourceSet.getResource(URI.createFileURI(musicXMLFile.getAbsolutePath()), true);
}

For most scenarios, the first three lines and the last line would be sufficient to load an XML file to a Java model. For MusicXML, I had to tweak the XML parser configuration a bit, because it tried to load MusicXML DTDs from a server which failed. Since we don’t need DTD validation anyway, I disabled the parser feature to load external DTDs. The map with the parser feature settings in turn has to be put as value for the load option key XMLResource.OPTION_PARSER_FEATURES, and EMF will take care of forwarding the parameters to the XML parser. Call getContents() of the returned resource to access the java model representation of the loaded XML file. Here is an example how score parts are accessed in MusicXML files:

1
2
3
4
5
6
EObject eObject = resource.getContents().get(0);
if (eObject instanceof ScorePartwiseType)
{
    ScorePartwiseType scorePartwise = (ScorePartwiseType)eObject;
    processParts(scorePartwise.getPart());
}

If you want to save a MusicXML java model to an XML file, basically use the same code as above, but save your model into the contents of a resource and then call resource.save().

That’s it 🙂 I hope this blog post illustrated how easy and powerful XML to Java object mapping can be when using EMF. Of course this can be done with any correctly structured XSD, not just with MusicXML.

Replacing org.eclipse.equinox.ds with org.apache.felix.scr in Eclipse Product Builds

In recent Eclipse versions, the declarative service implementation Equinox DS was replaced with Apache Felix service runtime components. As a result, my product build with an Eclipse 2018-12 target platform using Tycho failed with the following error:

Unable to satisfy dependency from toolinggtk.linux.x86org.eclipse.equinox.ds 4.2.0.201810261013 to osgi.bundle; org.eclipse.equinox.ds 1.5.200.v20180827-1235

To solve this problem, I had to update my .product file. Open it with the product editor and switch to the Configuration tab. In the middle, bundle start levels can be configured. Most likely your product file still contains an entry for org.eclipse.equinox.ds here. This has to be removed and replaced with an entry for org.apache.felix.scr with start level 2. This can easily be achieved by clicking the Add Recommended button on the right hand side. My resulting configuration looks like this:

Product Start Level Configuration

If everything is set up correctly, you can build your product again. Happy coding!

Adding Custom Splash Screens for Eclipse Products

Today I tried adding and configuring a custom splash screen to a custom Eclipse application, and found a number of pitfalls, which is why I decided to write a blog post summarizing the required actions.

Adding the Splash Bitmap

The splash image must be saved as a bitmap file named splash.bmp with 24 bits per pixel and should have dimensions of approximately 500×330 pixels. Save this file in the root of your product-defining plugin (which is usually named tld.domain.product.rcp). Specify this plugin in the Splash section of your .product file.

Enable Progress Reporting

To enable progress reporting on your splash screen, an .ini file for customizations must be defined. This is normally done in your RCP plugin, which contains a plugin.xml file declaring the extension org.eclipse.core.runtime.products. Under this extension, your product is defined. The product node typically contains child nodes with properties of your product, such as the name of your application (property appName). Here another property has to be added with the name preferenceCustomization and the value plugin_customization.ini. Create this file in the root of your RCP plugin if it does not exist already. To enable progress reporting for your splash screen, add the following line:

org.eclipse.ui/SHOW_PROGRESS_ON_STARTUP=true

Adjust Positions of Progress Bar and Progress Message

Now comes a pitfall: In older Eclipse versions, the positions of the progress bar and progress message could be adjusted in the product file. The following UI is provided for that:

However, in newer Eclipse versions the values of this UI are not used anymore! In order to configure the positions, properties have to be added in the previously mentioned plugin.xml file of your RCP plugin as children of your product node.

The positions are added in the form of comma-separated lists in the following format:

x, y, width, height

As an example, consider the following entries:

1
2
<property name="startupProgressRect" value="0,290,498,10"/>
<property name="startupMessageRect" value="5,310,493,15"/>

The coordinates are relative to the top left corner of the splash screen image. Additionally, the color of the progress message text can be changed with the property startupForegroundColor. The value is a hexadecimal color code with two hex digits for red, blue and green, respectively. For example, black font color can be specified with the following code:

1
<property name="startupForegroundColor" value="000000"/>

Relevant documentation can be found here:

Eclipse Enablement Expressions for Files with Specific Extension

While developing a UI plugin for Eclipse, I wanted to activate a specific context menu entry only for files with a specific extension. Because it took some time to figure the solution out, I decided to share it for others who want to implement this.

This example demonstrates the enablement for a launch shortcut, but of course this can be adapted to other extensions with enablement support, too.

One or More Files with Specific Extension

1
2
3
4
5
6
7
8
9
10
11
12
13
14
15
16
17
18
19
20
21
22
<extension point="org.eclipse.debug.ui.launchShortcuts">
  <shortcut class="tld.domain.plugin.ui.MyLaunchShortcut"
            icon="icons/icon.png"
            id="tld.domain.plugin.ui.launchShortcut"
            label="My Launch Shortcut"
            modes="run">
    <contextualLaunch>
      <enablement>
        <with variable="selection">
          <count value="+"/>
          <iterate operator="and">
            <adapt type="org.eclipse.core.resources.IFile">
              <test property="org.eclipse.core.resources.extension"
                    value="ext">
              </test>
            </adapt>
          </iterate>
        </with>
      </enablement>
    </contextualLaunch>
  </shortcut>
</extension>

The enablement is based on the selection, which should contain at least one element (count=+). Then the resources are iterated and adapted to IFile if applicable. Then the file extension is checked (in my example the extension ext, i.e. all files with the file name pattern *.ext are permitted). Note that the test properties must be given with a namespace (e.g. extension is wrong, whereas org.eclipse.core.resources.extension is correct).

One or More Files with Multiple Valid File Extensions

Another use case is to allow multiple file extensions. In this case, an additional <or> element is required as child of the <adapt> instruction as shown below:

1
2
3
4
5
6
7
8
9
10
11
12
13
<enablement>
  <with variable="selection">
    <count value="+"/>
    <iterate operator="and">
      <adapt type="org.eclipse.core.resources.IFile">
        <or>
          <test property="org.eclipse.core.resources.extension" value="xml"/>
          <test property="org.eclipse.core.resources.extension" value="xsd"/>
        </or>
      </adapt>
    </iterate>
  </with>
</enablement>

Added June 18, 2019:

Multiple Files with Multiple Valid Extensions

The following enablement tree will show the element if more than one file .xml or .xsd file is selected simultaneously. Note the corresponding count expression (1-, which means 1 to unbounded, where 1 is excluded.

1
2
3
4
5
6
7
8
9
10
11
12
13
14
15
16
17
18
19
20
<enablement>
  <with variable="selection">
    <count value="(1-">
    </count>
    <iterate operator="and">
      <adapt type="org.eclipse.core.resources.IResource">
        <or>
          <test
                property="org.eclipse.core.resources.extension"
                value="xml">
          </test>
          <test 
                property="org.eclipse.core.resources.extension"
                value="xsd">
          </test>
        </or>
      </adapt>
    </iterate>
  </with>
</enablement>

Single File with Specific Extension or Container (Project / Folder)

This will enable the UI element if a file with a specific extension, a project or a folder is selected:

1
2
3
4
5
6
7
8
9
10
11
12
13
14
15
16
17
18
19
<enablement>
  <with variable="selection">
    <count value="1">
    </count>
    <iterate ifEmpty="false" operator="or">
      <or>
        <adapt type="org.eclipse.core.resources.IFile">
          <test
                property="org.eclipse.core.resources.extension"
                value="mcl">
          </test>
        </adapt>
        <instanceof
                    value="org.eclipse.core.resources.IContainer">
        </instanceof>
      </or>
    </iterate>
  </with>
</enablement>

Also see the Eclipse Documentation for a full list of available properties and the Platform Expression Framework documentation.

Renaming git-managed Eclipse Projects

During longer development projects it sometimes becomes necessary to change the overall bundle structure, involving renaming packages and project/bundle names. For git-managed projects this requires one additional step in order to keep bundle names and their physical git location in sync. This blog post summarizes the steps for the most common refactoring actions.

Renaming Package Trees

Eclipse provides excellent support for renaming packages recursively. Right-click the root package of a bundle and then choose Refactor -> Rename. This brings up a dialog in which you can enter the new package name. This dialog also provides the option Rename Subpackages which will rename the whole package tree recursively. Note that all references to the classes in the renamed packages will also be updated.

Renaming Projects/Bundles

Renaming a project basically requires the same steps as renaming packages. Right-click a project, choose Refactor -> Rename and enter the new project name.

Now comes the interesting part: When renaming a git-based project the change will not be reflected in the filesystem of the git repository. Instead, only the <name> tag in the .project file is adjusted. You can verify this in the project properties in the Resource section (compare Path and Location).

To change to pyhsical git location, you have to specify the new location using the Refactor -> Move dialog. Here you can adjust the actual folder name in the git repository.

moveGitLocationAfter that, you can commit all changes in git. The history of the moved project will be preserved. I hope this will help you re-structuring your projects.

Standalone Parsing with Xtext

Xtext is an awesome framework to create your own domain specific languages (DSLs). Providing a grammar, Xtext will create your data model, Lexer, Parser and even a powerful Editor integrated into an Eclipse IDE including syntax highlighting and auto completion 🙂

In this blog post I want to summarize some of my experiences with the behaviour of Xtext using different parsing approaches. These are useful if you want to parse input with Xtext in standalone applications or in the Eclipse context in order to get a model representation of your DSL code.

Approach 1: Injecting an IParser instance

The first approach uses the IParser interface. In a standalone application (that means if your code is not running in an Eclipse/Equinox environment), a parser instance can be retrieved using the injector returned by an instance of <MyDSL>StandaloneSetup:

1
2
3
4
5
6
7
8
9
10
11
12
13
14
15
16
17
18
19
20
21
22
23
24
25
26
27
28
29
30
public class XtextParser {
 
    @Inject
    private IParser parser;
 
    public XtextParser() {
        setupParser();
    }
 
    private void setupParser() {
        Injector injector = new MyDSLStandaloneSetup().createInjectorAndDoEMFRegistration();
        injector.injectMembers(this);
    }
 
    /**
     * Parses data provided by an input reader using Xtext and returns the root node of the resulting object tree.
     * @param reader Input reader
     * @return root object node
     * @throws IOException when errors occur during the parsing process
     */
    public EObject parse(Reader reader) throws IOException
    {
        IParseResult result = parser.parse(reader);
        if(result.hasSyntaxErrors())
        {
            throw new ParseException("Provided input contains syntax errors.");
        }
        return result.getRootASTElement();
    }
}

Using this approach, your parse result can be retrieved with only very few lines of code. However, it only works in standalone applications. If you execute this code in the Eclipse context, the following errror is logged:

java.lang.IllegalStateException: Passed org.eclipse.xtext.builder.clustering.CurrentDescriptions not of type org.eclipse.xtext.resource.impl.ResourceSetBasedResourceDescriptions
    at org.eclipse.xtext.resource.containers.ResourceSetBasedAllContainersStateProvider.get(ResourceSetBasedAllContainersStateProvider.java:35)

To resolve this, the injector has to be created differently, using Guice.createInjector and the Module of your language:

1
Injector injector = Guice.createInjector(new MyDSLRuntimeModule());

Now the parser works fine, even in Eclipse. But if you use references to other resources or import mechanisms, you will find that the references to other resources can not be resolved. That’s why you need a resource to parse Xtext input properly.

Approach 2: Using an XtextResourceSet

To parse input using resources, you inject an XtextResourceSet and create a resource inside the ResourceSet. There are two ways to specify the input:

  1. an InputStream
  2. an URI specifying the location of a resource

In my implementation there are two methods for those two alternatives, respectively:

1
2
3
4
5
6
7
8
9
10
11
12
13
14
15
16
17
18
19
20
21
22
23
24
25
26
27
28
29
30
31
32
33
34
35
36
37
38
39
40
public class XtextParser {
 
    @Inject
    private XtextResourceSet resourceSet;
 
    public XtextParser() {
        setupParser();
    }
 
    private void setupParser() {
        new org.eclipse.emf.mwe.utils.StandaloneSetup().setPlatformUri("../");
        Injector injector = Guice.createInjector(new MyDSLRuntimeModule());
        injector.injectMembers(this);
        resourceSet.addLoadOption(XtextResource.OPTION_RESOLVE_ALL, Boolean.TRUE);
    }
 
    /**
     * Parses an input stream and returns the resulting object tree root element.
     * @param in Input Stream
     * @return Root model object
     * @throws IOException When and I/O related parser error occurs
     */
    public EObject parse(InputStream in) throws IOException
    {
        Resource resource = resourceSet.createResource(URI.createURI("dummy:/inmemory.ext"));
        resource.load(in, resourceSet.getLoadOptions());
        return resource.getContents().get(0);
    }
 
    /**
     * Parses a resource specified by an URI and returns the resulting object tree root element.
     * @param uri URI of resource to be parsed
     * @return Root model object
     */
    public EObject parse(URI uri) {
        Resource resource = resourceSet.getResource(uri, true);
        return resource.getContents().get(0);
    }
 
}

In both cases, the resource set is injected using Guice. Also, the Eclipse platform path is initialized using new org.eclipse.emf.mwe.utils.StandaloneSetup().setPlatformUri(“../”). The load option RESOLVE_ALL is added to the resource set.

If an InputStream is provided, the underlying resource is a dummy resource created in the ResourceSet. Make sure that the file extension matches the one of your DSL.

In case of a given resource URI, your resource can be parsed directly using resourceSet.getResource(). Using this approach, all references (even to imported / other referenced resources) will be resolved.

The Dependency Injection Issue

Still there is another problem because we use Dependency Injection here in a way which is not exactly elegant. The point is that a class should not need to care about how its members are injected. In a well-designed DI-based application, there is only one injection call and all members are intantiated recursively from “outside the class”. To learn more about this issue, please read this excellent blog post by Jan Köhnlein.

I hope this post was useful to you. Please feel free to share your thoughts / ideas for improvements.

Installing LaTeX, Eclipse and TeXlipse on Mac OS X

LaTeX is an essential typesetting language for scientific papers and presentations. In this blog post I will explain how to install a complete LaTeX environment on your mac based on MacTex, Eclipse and TeXlipse. These components form a very powerful IDE for writing documents with LaTeX.

Installing a LaTeX distribution

The recommended LaTeX distribution to install on OS X is MacTex. Just follow the link, download the (very large!) installation bundle and execute it.

Installing Eclipse

Eclipse is a very powerful software platform, allowing to install plugins in order to assemble a flexible and powerful IDE. Download Eclipse (Version for Java Developers) here for your appropriate processor architecture. Unpack the file and execute Eclipse.app inside the unpacked folder.

If you are running Mountain Lion and get a system message that “Eclipse can not be executed because the developer is not verified”, unlock the App by starting a Terminal window and typing the following command:

xattr -d com.apple.quarantine /Applications/eclipse/Eclipse.app

Of course, you have to change the path to your custom location.

When Eclipse is started for the first time, it will ask you for a “workspace location”. This is a folder on your hard disk where your projects and files that are edited in Eclipse are stored. Choose an appropriate location of your choice and select “use this as default and do not ask again“.

01_workspace

On the first start, a welcome screen will appear, which you can simply close.

Installing TeXlipse (Option A – via Eclipse Marketplace)

To install the LaTeX plugin for Eclipse named TeXlipse, you simply go to Help -> Eclipse Marketplace.

03_marketplace

Wait until the list is loaded and type texlipse into the search field. TeXlipse will be listed as first option in the list. Click the Install button.

04_marketplace2

In the following dialog, click Next, read and accept the license and then click Finish. If you get a security warning saying that “you are trying to install software with unsigned content”, click OK. After the installation you’ll be asked to restart Eclipse, which you confirm with Yes.

Installing TeXlipse (Option B – Update Site)

If for some reason the menu item Eclipse Marketplace is missing, you can also install TeXlipse via Help -> Install new Software. In that case, you need to provide an Update Site, which is http://texlipse.sourceforge.net/.

Configuring TeXlipse

After the successful installation, TeXlipse needs some configuration. Therefore, go to Eclipse -> Preferences (Shortcut: Cmd + ,).

05_settings

In the preferences, go to TeXlipse -> Builder Settings. Here the paths to the MacTex binaries have to be set.

To set all paths simultaneously, click on the Browse… button and choose your LaTeX executable folder. On my system (64 bit), the path is

/usr/local/texlive/2011/bin/x86_64-darwin

On 32 bit systems, the path should be similar to

/usr/local/texlive/2011/bin/universal-darwin

After the path is selected, hit the Apply button. Now almost all executable paths should be configured (see screenshot).

06_builders

Next, you have to configure a PDF viewer. Go to TeXlipse -> Viewer settings -> New… and add the values shown in the screenshot (Name: open, Command: /user/bin/open, Arguments: %file).

08_viewer

Move your configuration up in the list.

09_viewer2

Creating a LaTeX project

To create your first LaTeX project, right click inside the Package Explorer (on the left) and choose New -> Project… and in the dialog select TeXlipse -> LaTeX Project. On the next screen, enter a project name and the language code and choose the output format pdf. The builds commands should automatically switch to pdflatex. The article template is a good starting point.

07_project

When you click Finish, Eclipse will ask you if the LaTeX perspective should be opened, which you confirm with Yes.

Building the PDF

To build the PDF, simply make changes to a .tex file and save it. Eclipse will automatically trigger a PDF build on every document save action. You can view the output in the console (located at the bottom of the IDE by default). To view the PDF, use the shortcut Cmd + 4. If everything went fine, you should see a simple PDF file:

10_pdfNow you are ready to write great papers with LaTeX. Enjoy 🙂