When Logic Destroys Your Audio Files

This post is about a serious bug in Logic, which causes audio files to be damaged. The symptom of this bug is the following error message when opening a previously perfectly working project: One or more audio files changed in length.

Background

This is how I encountered the bug: we had recording sessions with our band and had completed the first session. In the studio, we could listen to all tracks without any problems. After some time, when our sound engineer opened the project again, he encountered the error message above for some files. After listening through the projects, he discovered that a large number of audio clips could not be played back anymore. We had one backup of the project we had made right after the recording session, but unfortunately it contained the same corrupted files. This meant that we had to repeat the recording session 🙁

We had a few more recording sessions, after which we made 3 or 4 backups right away. After we had recorded a whole album, the issue occurred again. The files were corrupted on all backups again, although we could listen to the tracks in the studio without problems. Consequently, the data was corrupted after the recording and before re-opening the Logic project.

Then, our sound engineer noticed the following: when he opened a project for the first time, logic reported 4 corrupted files. When opening the same project again, suddenly 24 files were corrupted. This leads to the conclusion that Logic itself is responsible for destroying the audio files.

Conditions under Which the Bug Occurs

The exact conditions under which the error occurs are not exactly clear, but one of the following things or a combination of those things seems to be involved:

  • Using hard drives or SSDs that are not formatted with an Apple File system (i.e. Mac OS X Journaled or APFS)
  • Using external (hard) drives
  • Using the Comping Feature in Logic (the one where you see multiple takes stacked on each other and can combine them to an “optimal” take)

The files are damaged when logic is closed, which means that even if the project works perfectly before closing the application, there is no guarantee that it will work when opened again.

We experienced these problems with Logic 9, but internet forum posts suggest that it can also happen with Logic Pro X. If someone can confirm, knows the exact error conditions or has any updates, please feel free to comment.

Error Analysis

Logic destroys the audio files in seemingly random order, e.g. in a sequence of 79 audio files recorded for one track the files with numbers 43, 48, 56, 57, 58, 59, 65, 74 and 79 were corrupted.

For a more thorough analysis, I compared working files with corrupted files using a Hex editor, in which each single byte in the file can be visualized in hexadecimal representation. The first bytes of an intact wave file look like this:

For a detailed description of each byte, refer to this page. In short, these are the contents of the wave file header:

  • Bytes 1-4: RIFF chunk descriptor
  • Bytes 5-8: chuck size (total number of bytes in the file after this block)
  • Bytes 9-12: format (in this case WAVE)
  • Bytes 13-16: fmt-subchunk header (contains fmt )
  • Bytes 17-20: subchunk 1 size (in this case 16 for PCM)
  • Bytes 21-22: audio format (1 = PCM)
  • Bytes 23-24: number of channels (1 = Mono, 2 = Stereo, etc.)
  • Bytes 25-28: sample rate (e.g. 44,100 Hz)
  • Bytes 29-32: byte rate: number of bytes required to store 1 second of audio for all channels (= sample rate * number of channels * bits per sample / 8)
  • Bytes 33-34: block align: number of bytes required to store one sample in all channels (= number of channels * bits per sample / 8)
  • Bytes 34-36: resolution in bits per sample, e.g. 8, 16 or 24 bits
  • Bytes 37-40: data chunk header (contains data)
  • Bytes 41-44: number of bytes representing the raw audio data
  • Bytes 45ff.: raw audio data

Now let’s have a look at a destroyed audio file:

If the bug occurs, Logic fails to write the wave header correctly. Instead, the file contains only zeroes in the first 44 bytes, which is exactly the length of the wave header. The good news: the raw audio data, starting at byte 45, is still intact (note that the hex editor starts counting bytes at index 0).

If such a corrupted wave file is opened, logic can’t read the header and assumes a default 8 bit setting, which leads to a misinterpretation of the audio data. Consequently, the length of the file will also be misinterpreted. Furthermore, the interpretation will be even more off because a wrong sample rate is assumed. Not good.

Repairing the Audio Files

As a preliminary fix, you can restore the destroyed files by copying a wave file header (i.e. the first 44 bytes) from a correct file (with matching sample rate and bit depth) to a corrupted file in a hex editor.

Update August 29, 2019: It was confirmed that this also works for AIFF files. In this case, the first 512 bytes have to be copied. Thank you very much to Sawyer Wildgen for sharing this!

A wave file header specifying a sample rate of 44.100 Hz and 24 bit resolution starts with bytes similar to these (in hexadecimal representation):

1
52 49 46 46 5B 89 3E 00 57 41 56 45 66 6D 74 20 10 00 00 00 01 00 01 00 44 AC 00 00 CC 04 02 00 03 00 18 00 64 61 74 61 6B 5C 3E 00

However, one potential issue now could still be that the (sub)chunk sizes (bytes 5-8 and 41-44) are not correct, but most audio editors don’t check these values. If you want to correct these as well, make sure that you use the correct little endian representation for these byte groups. This means the byte order is reversed. A complete example is given below.

The formulas to calculate the correct values for WAVE files are:

  • chunk size = <file size in bytes> - 8
  • data chunk size = <file size in bytes> - 44

Integer to Little Endian Hex Conversion

Example: Converting the number 44,100 to a little endian hex number:

  1. Convert number to hex using a scientific calculator or an online converter such as this one. The result is: AC 44. Note that this result comprises two bytes and is encoded big endian (most significant byte first).
  2. Make sure the result is padded to the correct byte size. If the field in the header is 4 bytes, we have to add two zero bytes at the beginning: 00 00 AC 44
  3. Reverse the byte order: 44 AC 00 00. The result is now little endian (least significant byte first), as required by the wave header specification.

To confirm, you can open a working wave file with 44,100 Hz sample rate in a hex editor and check bytes 25-28, which will contain 44 AC 00 00.

Using Wave Recovery Tool to Restore the Wave File Headers

Because quite many files were damaged in our case, I did not want to fix all wave headers manually. Therefore, I developed a program which can fix the wave files all at once. Wave Recovery Tool is available on github and is published under the terms of the GNU General Public Licence.

Conclusion

This post reveals a serious bug in Logic, which can potentially destroy hours and weeks of hard work. Fortunately, the data can be restored completely either manually or using a Wave Recovery Tool I developed. I seriously hope that this bug will be fixed soon or is already fixed in recent versions of Logic.

Notes Regarding AIFF Files

In this blog post, I demonstrated the issue by means of wave file header structures. The same can be done for AIFF files, however the header structure is more complex. The good news: I extended Wave Recovery Tool and now it is also possible to restore AIFF files under certain conditions.
Getting Rid of Rattling Sounds in a Dual 1210 Record Player

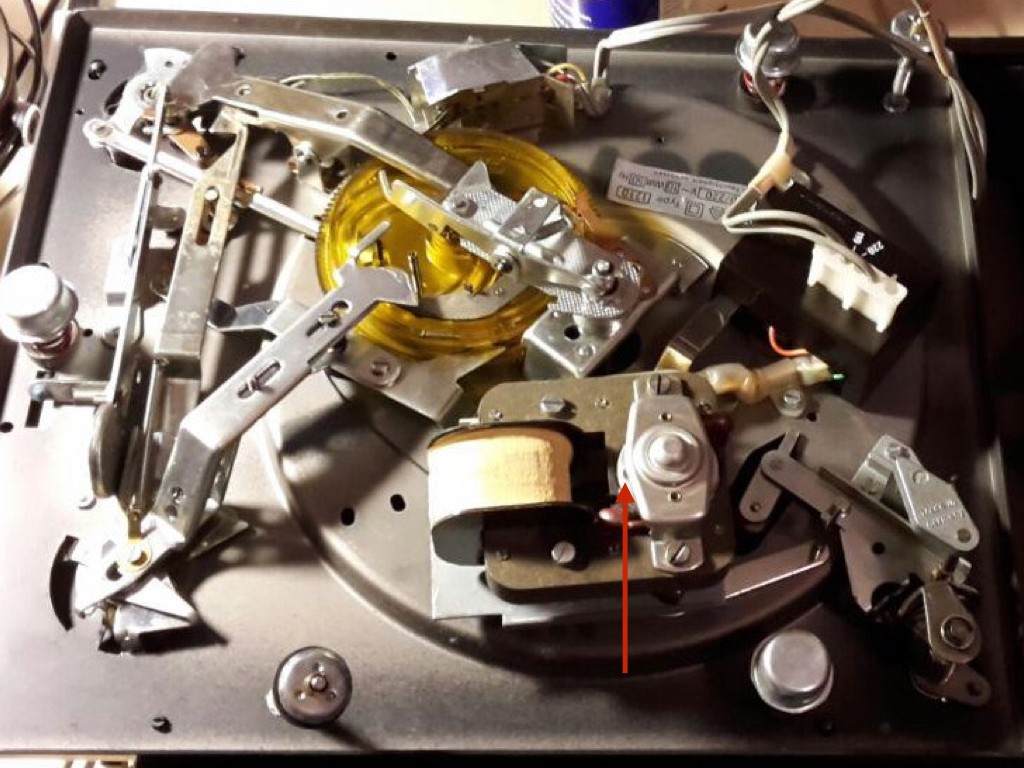
Vintage record players like the ones produced by the German company Dual are still popular today because of their excellent workmanship and sound. I have the privilege of owning one and using it regularly. Unfortunately it began making an annoying rattling sound lately. This is how I repaired it: The first challenge is opening the record player. I found this video explaining how this is done for Dual record players. The following picture shows the inside of the device. The mechanical constructions for the automatic movement of the arm are absolutely amazing!

DualPlattenspielerMitPfeilThe rattling sound was caused by the motor, which is located in the lower center of the picture. In order to get rid of the noise, you have to disassemble the parts surrounding the motor and oil them well. Afterwards the record player should work smoothly again. If this does not help, it might be necessary to disassemble the motor itself as explained here.

Displaying Tracks of your Music Library Filtered by Bit Rate

If you prefer managing your music in the form of audio files on your computer, your collection has probably grown over the past few years and at the same time encoding standards have improved and expectations of sound quality have risen. In most cases, the contained audio files have different sound qualities regarding their bit rates. My motivation was to display a list of files in my music collection which have a bit rate equal to or higher than 256 kbit/s.

To achieve this, I looked for command line tools that display metadata for audio files including their bit rate. For Mac OS X I found the command afinfo which works out of the box:

afinfo myFile.mp3 | grep "bit rate"

The output looks similar to this:

bit rate: 320000 bits per second

If you are using another operating system, you can check for the following commands and/or install them:

1
2
3
4
5
file <fileName> (Ubuntu)
mp3info -r a -p "%f %r\n" <fileName>
mediainfo <fileName> | grep "Bit rate"
exiftool -AudioBitrate <fileName>
mpg123 -t <fileName>

My goal was to develop a program that crawls through my whole audio collection, checks the bit rate for every file and outputs a list containing only files with high bit rate. I wrote a Python script which does exactly that:

1
2
3
4
5
6
7
8
9
10
11
12
13
14
15
16
17
18
19
20
21
22
23
24
25
26
27
28
29
30
31
32
33
34
35
36
37
38
39
40
41
42
43
44
45
46
47
48
49
50
51
52
53
54
55
56
57
'''
Created on 25.04.2015
 
@author: dave
'''
 
import sys
import os
import subprocess
import re
 
# console command to display properties about your media files
# afinfo works on Mac OS X, change for other operating systems
infoConsoleCommand = 'afinfo'
 
# regular expression to extract the bit rate from the output of the program 
pattern = re.compile('(.*)bit rate: ([0-9]+) bits per second(.*)', re.DOTALL)
 
def filterFile(path):
    '''
    Executes the configured info program to output properties of a media file.
    Grabs the output, filters the bit rate via a regular expression and displays the
    bit rate and the file path in case the bit rate is >= 256k
    Returns True in case the file has a high bit rate, False otherwise
    '''
    process = subprocess.Popen([infoConsoleCommand, path], stdout=subprocess.PIPE, stderr=subprocess.PIPE)
    out, err = process.communicate()
    match = pattern.match(str(out))
    if match != None:
        bitRateString = match.group(2)
        bitRate = int(bitRateString)
        if bitRate >= 256000:
            print("bit rate",bitRate,":",path)
            return True
    return False
 
def scanFolder(rootFolder):
    '''
    Recursively crawls through the files of the given root folder
    '''
    numFiles = 0
    numFilesFiltered = 0
    for root, subFolders, files in os.walk(rootFolder):
        for file in files:
            numFiles = numFiles + 1
            path = os.path.join(root,file)
            if filterFile(path):
                numFilesFiltered = numFilesFiltered + 1
    print("Scanned {} files from which {} were filtered.".format(numFiles, numFilesFiltered))
 
# main program
if len(sys.argv) != 2:
    print("Usage: MP3ByBitrateFilter ")
    sys.exit(1)
 
rootFolder = sys.argv[1]
scanFolder(rootFolder)

The root folder of your music library can be given as command line argument. The programs walks through the folder recursively and executes the command line program to display the bit rate in a separate process. It grabs the output and filters the bit rate from the output using a regular expression. The bit rate and the path of the file are displayed in case the bit rate is >= 256 kbit/s. A summary is also displayed showing the total number of files and number of filtered files.

Of course you can extend the filter criteria by adjusting the script to extract other information than the bit rate from the info command.

Creating Audio Unit Plugins with SuperCollider

In this post I’ll show you how to build Audio Unit Plugins programmed in SuperCollider using the AudioUnitBuilder. First of all, I want to refer to this excellent Tutorial, in which Abel Domingues explains in great detail how the whole Audio Unit architecture works and how the SuperCollider AU works. I would advise you to read this first, especially if you want detailed background knowledge. However, some things were not working for me out of the box and therefore I decided to share some problem solutions here.

My instructions were created with the following Setup:

    • Mac OS X Mountain Lion (10.8.4)
    • SuperCollider 3.5.1
    • Xcode 4.6.3 (4H1503)

Install Dependencies

First of all, the following software prerequisites need to be installed:

  1. Download and install SuperCollider 3.5.1 to a location of your choice.
  2. Download Xcode 4. This requires an Apple Developer Account. Unfortunately, the file is very large (1.7 GB). Install it and open it (make sure you don’t confuse it with your old Xcode, if you had one before)
  3. In Xcode, click on the Main Application Menu and go to Open Developer Tool -> More Developer Tools. Alternatively, you can go directly to this page. Download the Command Line Tools for Xcode and install them.
  4. Download the SuperCollider AU from here. It has to be extracted to ~/Library/Audio/Plug-Ins/Components.
  5. Open your SuperCollider and execute Quarks.gui. Install the AudioUnitBuilder Quark (you need to have an internet connection and SVN installed for that).

Adjust Paths in the AudioUnitBuilder Code

The current AudioUnitBuilder refers to some old paths, which have changed. In particular, the Rez executable is now in another location, as well as the Server Plugins. Both are now packaged into an .app Container. Open the AudioUnitBuilder Source Code (mark the classname and press Cmd+Y). Inside the file you see the classvar

1
classvar <>rez="/Developer/Tools/Rez"

which has to be changed to

1
classvar <>rez="/Applications/Xcode.app/Contents/Developer/Tools/Rez"

Next, look for the method copyPlugins (in the lower third of the class). The line

1
2
cmd = "grep  -e _"++ugens.asSequenceableCollection.join("_ -e _") + 
"_ plugins/*.scx";

must be changed to

1
2
cmd = "grep  -e _"++ugens.asSequenceableCollection.join("_ -e _") +
"_ SuperCollider.app/Contents/Resources/plugins/*.scx";

Don’t forget to recompile your library (Cmd+K) before you proceed.

Open An Example AU Specification

The AudioUnitBuilder comes with an example file called fedDelay.rtf. You find it in the Quark Installation Directory, which is ~/Application Support/SuperCollider/quarks/AudioUnitBuilder/examples. Open the file in SuperCollider.

To use the AudioUnitBuilder, you’ll need to specify the following:

  • Name of your Audio Unit
  • Component Type (\aumu, \aumx, \augn or \aufx, which stands for Instruments, Mixers, Generators or Effects, respectively)
  • Component Subtype (A four letter code identifying your plugin)
  • specs: A two-dimensional array specifying the parameters for your plugin
  • func: the function implementing the actual signal processing

Building the Audio Unit

At the end of the example file, you see the simple instructions needed to build your AU using the AudioUnitBuilder:

1
2
builder = AudioUnitBuilder.new(name, componentSubtype,func, specs, componentType);
builder.makeInstall;

Basically the things we have specified are passed in the constructor, and then the method makeInstall does the magic. Hm, but what does it do actually? It is a good idea to look into the source code to understand it. I will try to summarize it here shortly:

  1. The contents of SuperColliderAU.component are copied recursively to <yourPluginName>.component
  2. All plugins (Ugens) are deleted
  3. XML Property list files are created to configure the server running inside the AU and your plugin
  4. A Resource file is created based on a template (which is SuperColliderAU.rsrc in the quark directory). Some placeholders in that template are replaced using the sed Unix command. The resource is processed with the Rez tool delivered with Xcode.
  5. The DSP function you specified is compiled as SynthDef.
  6. The compiled SynthDef is copied to the synthdefs folder inside the AU.
  7. Plugins (UGens compiled as .scx files) needed for signal processing are copied from your SuperCollider installation to the AU.

To let the AudioUnitBuilder do all those things for you, you simply need to select the whole file and execute it. If you are lucky, you will get an output like

Created ~/Library/Audio/Plug-Ins/Components/fedDelay.component
an AudioUnitBuilder

But if something goes wrong, here are some of my solutions and debugging tips:

  • I got “Error running Rez” on the console which I traced down to an inclusion problem in the resource file. If you open  SuperColliderAU.rsrc file in a text editor, you’ll see the inclusion #include <CoreServices/CoreServices.r> which could not be resolved. The solution is to install the Xcode Command Line Tools, as described above.
  • You can debug the commands executed in the Builder by changing .systemCmd calls to .postln.systemCmd.
  • You can inspect the files created during the building process by changing mv commands to cp commands. This way all files can be reviewed in the quarks/AudioUnitBuilder directory.
  • Check the contents of the .component target file by browsing it in the Finder (right click -> Show Package Contents).
  • My working Audio Unit has a size of about 2 MB. If it is significantly smaller, that you might forgot to put the SuperColliderAU.component as skeleton AU into your Plug-Ins/Components folder.

The working AU should contain

  • Contents/MacOS/SuperColliderAU
  • Resources/plugins/(some .scx files)
  • Resources/pluginSpec.plist
  • Resources/serverConfig.plist
  • Resources/SuperColliderAU.rsrc
  • Resources/synthdefs/fedDelay.scsyndef

Alright? Then let’s validate our AudioUnit.

Audio Unit Validation

Apple developed a tool called auval to validate Audio Units. This is very useful for debugging, as you see error message from the SuperCollider server during the validation process.

Open a terminal window and execute

1
auval -v aufx FEDL SCAU

This will start the validation process for the plugin identified by a triple. The three parameters are component type, component subtype and manufacturer. Read the output if you find any error messages like “SynthDef not found”. If this is the case, then you most likely used the wrong SuperCollider version. To be compatible with the server shipped in the AU, the AudioUnitBuilder must be executed with SuperColldier 3.5.1.

Try Out Your Audio Unit

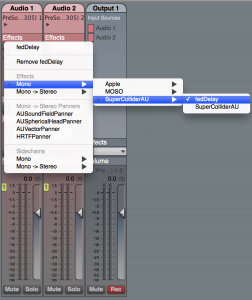
If validation passed successfully, you can use your AU in any AU-compatible audio environment. For example you can download the Audio Tools for Xcode from the Apple Developer page. It contains an App called AU Lab, which you can use to test your plugin. Here is how you insert the AU as effect:

selectAUAnd this is the generated UI to control the plugin:

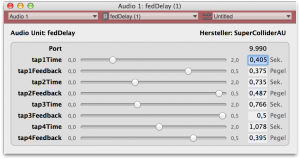
fedDelayAUControlsSo this is it. I hope you got your AU running and have lots of fun coding you own AUs with SuperCollider 🙂

Creating your own SuperCollider-based Standalone Application

Let’s build our own standalone application based on the ingenious sound synthesis engine and programming language SuperCollider! These instructions were created with SuperCollider 3.5.5 and are suitable to create a standalone app for OS X.

Here is what we need to do:

  1. Download a source distribution of SuperCollider from here.
  2. Extract the source files to a directory and rename SuperCollider-Source to the name of your app (e.g. MyApp)
  3. In platform/mac, create a copy of the folder Standalone Resources and rename it to MyApp Resources (replace with your app name).
  4. Inside your MyApp Resources, delete the file SCClassLibrary/SCSA_Demo.sc.
  5. Copy any custom classes that your app requires inside the SCClassLibrary folder.
  6. Edit the modifyStartup.sc file to define what your app does when it starts. Here you can remove the post window, for example. Make sure to comment or delete the lines where SCSA_Demo is initialized.
  7. (optional) Change the icon (SCcube.icns). Download the application img2icns, which converts any images into the OS X .icns format. Overwrite the old SCcube.icns file with your icon.
  8. (optional) Edit the file English.lproj/MainMenu.nib. Here you can adjust the menu located at the top of the screen of your application. A better alternative to add new menu items for your SuperCollider application (on Mac OS X) is a custom class adding the following startup instructions:
1
2
3
4
5
6
7
8
9
10
11
12
13
14
15
16
17
18
MyClass {
 
    *initClass {
        if(Platform.ideName == "scapp") {
            StartUp.add {
                this.createMenu;
            }
        }
    }
 
    *createMenu {
        var menuGroup;
        menuGroup = SCMenuGroup(nil, "My Menu", 13);
 
        SCMenuItem(menuGroup, "My Item")
            .action = { "Item selected!".postln };
    }
}

Ok, now it’s time to compile and package your standalone application. Open a Terminal window and execute the following commands:

1
2
3
cd /path/to/MyApp
mkdir build
cd build

This will create a directory build in your application’s source directory. The reason we do this is that the build artifacts are cleanly separated from the source files. Now we configure the build process using cmake:

1
cmake -DCMAKE_OSX_ARCHITECTURES='i386;x86_64' -D standalone="MyApp" ..

These commands make sure your app is built with support for 32bit and 64bit architectures (-DCMAKE_OSX_ARCHITECTURES=’i386;x86_64′) and that the resources for your custom app are used (-D standalone=”MyApp”). The two dots at the end indicate that the source files are located in the parent folder, not in the build folder we just created.

If you don’t need QT in your app, you can omit it, which will result in an application bundle consuming much less space on the hard disk:

1
-DSC_QT=OFF

If everything goes fine, cmake will check for some components and in the end appears a message similar to

-- Configuring done
-- Generating done
-- Build files have been written to: /Users/name/Development/SuperCollider/MyApp/build

Now the build configuration is saved, consequently we won’t have to run the cmake command again fur future builds. Now we’re ready to compile our app.

1
make install

After the build process, which takes some time when executed for the first time, your bundled App is waiting for you in build/install/MyApp/MyApp.app. That’s it 🙂

For future builds, you might want to program a litte build script, which updates the resource files and executes the build automatically. A very simple example could be:

1
2
3
mkdir ../platform/mac/MyApp\ Resources/SCClassLibrary/SomeFolder/
cp ~/Library/Application\ Support/SuperCollider/Extensions/SomeFolder/* ../platform/mac/MyApp\ Resources/SCClassLibrary/SomeFolder/
make install

This script creates a target folder and copies a bunch of classes from your Extensions directory to that folder. Save it as .sh file in your build directory, and simply execute this if you want a new version of your App. For security reasons, the file might not be executable from scratch. In this case, you have to modify its permissions:

1
chmod 755 build.sh

Now your script should be executable. And now: have fun with your app!