Graphviz is a great open source graph visualization software. In this post I’ll demonstrate how to include DOT graphs in PDF documents using LaTeX.
The most convenient way to insert graphics into PDF documents is to use vector graphics. In contrast to raster graphics (which are pixel-based) vector graphics can be scaled arbitrarily without getting “pixelated”.
From DOT the graphics can be exported in vector graphics as Portable Document Format (PDF) or Encapsulated Post Script (EPS) files. The file type you need depends on the LaTeX compiler you are using. The standard latex compiler can handle EPS files, whereas pdflatex supports PDF graphics.
Option 1: Using latex and EPS graphics
Assuming you have persisted your graph in a dot file, say myGraph.dot, you can convert it to an Encapsulated Post Script (EPS) file by using the dot tool from the command line:
1 | dot -Tps2 myGraph.dot -o myGraph.eps |
Here is a nice shell script which converts all dot files in the current directory to eps files:
1 2 3 4 5 6 7 8 | #!/bin/bash for f in *.dot; do basename=$(basename "$f") filename=${basename%.*} command="dot -Tps2 $f -o ${filename}.eps"; echo $command; $command; done |
To use it, simply save it as an .sh file, execute chmod 755 on it and execute it in the terminal (works for unix-based systems only).
Having done that, we try to insert that image in our pdf file:
1 2 3 4 5 6 7 | \begin{figure}[htp] \begin{center} \includegraphics[width=0.9\textwidth]{myGraph} \caption{My Caption} \label{fig:myGraph} \end{center} \end{figure} |
Note that the file extension is ommited.
Unfortunately, the pdflatex compiler does not support EPS images. But don’t worry, there are two options for solving that.
Option 2: Using pdflatex and PDF graphics
If you are using pdflatex, PDF graphics have to be produced instead of EPS graphics. This is done as described in the previous section, except another target file type is specified:
1 | dot -Tpdf myGraph.dot -o myGraph.pdf |
Option 3: Using pdflatex and converting EPS to PDF on the fly
The epstopdf LaTeX package converts your EPS files to PDF files on the fly, which then can be included in your document. This is how you must configure your graphic packages in the preamble of your LaTeX document (code from this blog post):
1 2 3 4 5 6 7 8 9 10 11 12 13 14 15 | \newif\ifpdf \ifx\pdfoutput\undefined \pdffalse \else \pdfoutput=1 \pdftrue \fi \ifpdf \usepackage{graphicx} \usepackage{epstopdf} \DeclareGraphicsRule{.eps}{pdf}{.pdf}{`epstopdf #1} \pdfcompresslevel=9 \else \usepackage{graphicx} \fi |
The epstopdf package will automatically create a PDF file of your figure and include it in your document. However, the following requirements must be fulfilled:
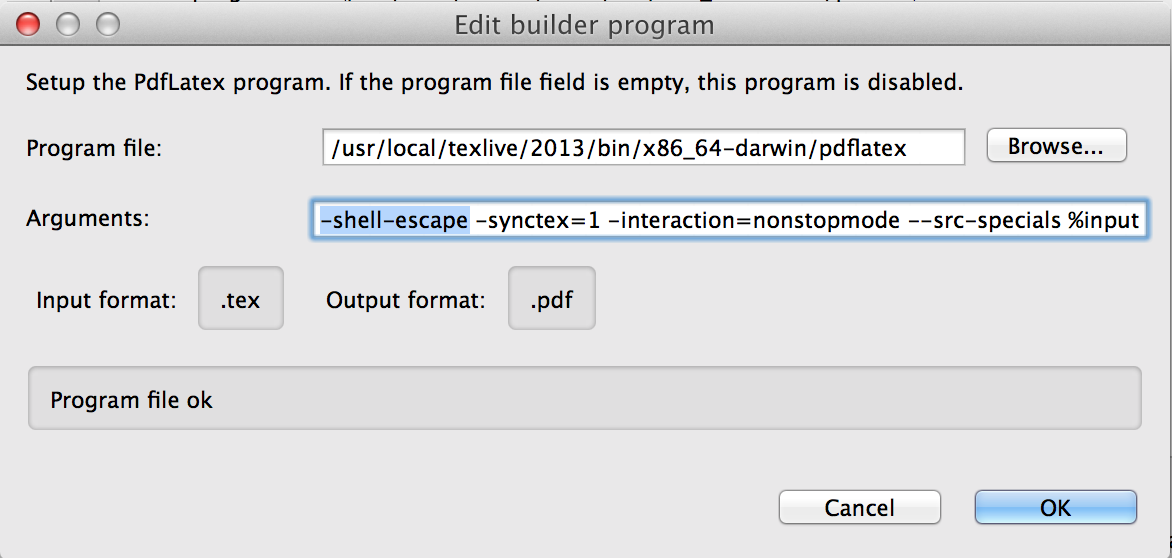
The -shell-escape option must be set when invoking the compiler. The command line setting for this invocation can be set in your LaTeX IDE. Here I will illustrate how to configure this setting using the TeXlipse IDE for Eclipse:
 Open Preferences -> Texlipse -> Builder Settings, select the PdfLatex program and click Edit. The following dialog appears, in which you can add the -shell-escape option to the command line:
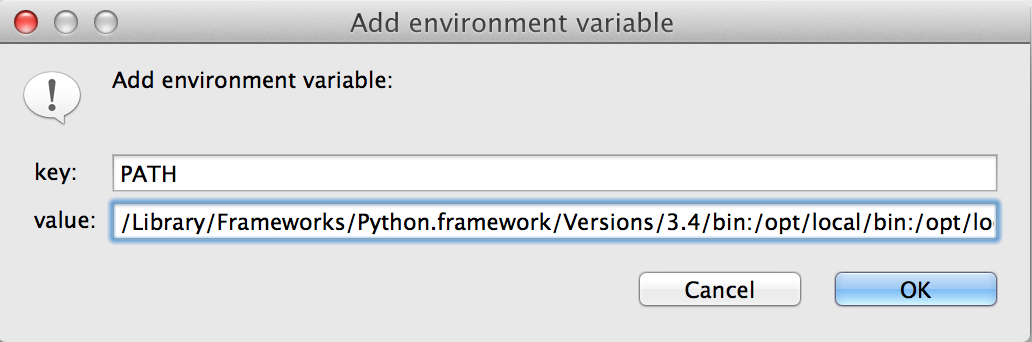
 Another requirement (which is specific to the TeXlipse environment) is the PATH variable, which has to be set. Otherwise, the shell commands called from LaTeX can not be executed correctly. Check out your system path by opening a terminal and typing:
1 | echo $PATH |
Copy the output to the clipboard, and in TeXlipse go to Preferences -> TeXlipse -> Builder Settings -> Environment. Click Add and create a new environment variable named PATH with the value of your system path, which you just copied from the terminal:
 After that, the EPS-to-PDF conversion should work on the fly. If it does not work for some reason, you can manually invoke the conversion from the command line:
1 | epstopdf myGraph.eps |
You can now publish PDF documents with infinitely-scalable graphs 🙂